Screen Printing: Experimenting with Layers

I decided to experiment with technique before committing to designing and making a new print that relied on layering, in case it failed. I tried to divide my screen this time to utilize the space, and consequently time it takes to print. The screen is much larger than any of the prints I’ve made, so I thought for a multi-layered print, I would lay out each of the components on one screen. I’ve seen this division of the screen surface before in images and video of people printing, but they use painter’s tape, which I didn’t have. I tried using Scotch brand washi tape, which didn’t quite do the job of painter’s tape (which I’ve subsequently bought). I made a pond design (really an oval) on one part of the screen and simple tree shapes on the other part using drawing fluid. This was the first time I used my new brush set, and while it gave me better variance to choose from, ultimately, the medium of the drawing fluid is difficult to control (it is sort of like painting with Elmer’s white glue – it oozes and doesn’t allow for very fine detail). I printed the pond base on paper using red ink and printed my first layer of trees using black ink. I let this dry and put on another layer of the pond print, but this time I mixed transparent base in with the ink so that the first layer of black trees would show through. After the second pond layer (with transparency) dried, I added another layer of trees in between the first layer.

The transparency kind of worked, that is, the first layer of trees can be seen through the red pond layer, but the experiment print looked rough in the sense that I didn’t have control over what I was doing while making the print. I feel conflicted about this, especially realizing at the Salt Market that I am comparing my prints to prints made with another technique that is not dictated by the precision (or lack thereof) of one’s design capabilities done by hand. I have no doubt that people who are skilled graphic artists can create fine detailed prints with drawing fluid by hand, but it feels a little like comparing a handmade (and thus rough for lacking machine controlled “perfection”) thing with something that has been largely made by machine, though still handmade. Screen prints using the photo emulsion technique still need to be designed on the computer or whatever before they are set onto a screen to be printer, but they use tools and techniques (photo programs or photo images) that I cannot make on my own. My lacking design skills are keeping me from making the prints I want; my designing must improve. I found myself thinking of Ruskin and the imagination of the craftsman – maybe I need to be in an environment where I can be inspired by nature. Instead of trying to develop design skills of hand that work with computer programs, I need to find material that I can represent (and appreciate it as having charm in its roughness).

While this print brought new perspective to my process, it also killed my screen. This is my fault entirely as a neglect for my tools; I let the screen sit an entire busy day without cleaning it. I worked on it, but to no avail. The ghost of my last print lingers on he screen. I thought about continuing to print with it, but this screen is now “art” for the apartment. As a means of laying out a design, it obscures too much. And as is evident in the field of the pond, taking it to the car wash destroyed the network of the screen leaving gaps that disrupted the even distribution of ink. I bought a different screen at The Art Store that I look forward to using in making my midterm project. I’m still looking into what makes it feel different – it is not a Speedball brand, the screen is of different mesh size, is yellow, and seems to have a more rigid taut nylon feel (more like plastic) than the soft screen I was using. While purchasing the new screen, I asked advice of an artist there that printed on how to clean screens, since I continue to have trouble. She seemed baffled by this, as seems to be the attitude of seeking answers to this issue, responding that she’s never had trouble cleaning screens. I’m left in the dark. I don’t know what the mystery is behind cleaning a screen, but I’m at a loss for any other elements I can change in my work and material environment. This makes me feel a different type of failure than that of my design capabilities – who would have thought that cleaning up would be the most difficult part of making? It leaves me wondering what I don’t understand about my materials, primarily time it takes for them to set, how long they can sit, and how long it should take to care for them in cleaning. What I wouldn’t give to be able to observe a master printer in their own workshop and washtub.

Screen Printing: Screen Status

After my last failed print with drawing fluid, I was hesitant to print again. With a meager budget, I was worried I destroyed my screen. To reiterate (condensed version): the screen filler in my last design would not wash out of my screen. I did not have any Speedball screen cleaner, and was trying to use household cleaners I did have that I read about on discussion boards – Greased Lightning, Mr. Clean, and dishwasher detergent. None of these cleaners seemed to have any impact, so returning to the boards, I read about some printers suggestion to use a power washer. Not owning a power washer in my city apartment (I don’t even have a hose), I took my screen to the touchless car wash late on a Sunday night (part of the reason I couldn’t purchase Speedball cleaner – the art store nor the craft store were open). Too many quarters later, my screen still wasn’t clean. While the power washer took off some of the screen filler, much remained. I had to wait a few days before I had money to purchase more Speedball cleaner; meanwhile the screen sat with the filler still in the mesh. Cleaning with the Speedball cleaner helped, but a ghost of the print remained. Since then I have been trying to find an answer for why the filler wouldn’t come out because I am following the written instructions. I suspect however that being able to talk to someone who has screen printed might provide me with what Richard Sennett calls “expressive instructions” – the tacit, embodied knowledge that language has a difficult time representing. I wonder, without a source of expressive instruction if:

  • Perhaps I have the wrong type of bristles in my brush (too hard? too soft?)
  • The temperature or pressure or amount of water I use to wash my screen isn’t the most effective
  • The pressure that I apply to scrub the screen isn’t right
  • The amount of time I let the screen cleaner sit isn’t long enough
  • The amount of time the screen filler stays on the screen is too long
  • The amount of cleaner I use is enough
  • The amount of screen filler I use is too much

And so on.

Where can I turn for expressive instruction? I’ve thought about approaching a faculty member from the studio arts program, but I don’t know what’s stopping me (those disciplinary boundaries?). This is probably a path that I should brave and venture. At a recent community event, I learned of a non-profit organization opening up called SALT Makerspace, a studio(s) space to share tools, collaborate, and learn from a community of craft. They’re just opening, but I have seen the skeleton of a screen printing workshop they’ll offer. But the workshops and using the space cost money per month that I don’t have. What I do feel like I have access to, even though I can’t direct my interaction with it specifically to me, is the web. I’ve read forums, watched YouTube videos, and looked at accounts of people’s processes. Either cleaning the screens isn’t addressed, it’s addressed with the instructions that come on the Speedball cleaner bottle, or it does show the process but it is for light emulsion printing, which I’m not doing. It doesn’t seem like I should be having problems, but I am. Moreso, I believe I have trashed the mesh of my screen. While I don’t know the effect that it will have on my prints, the mesh is stretched and warped in places. My next print will be simple until I am confident enough that future prints will not be too impacted by the screen distortion.

Screen Printing: Drawing Fluid + Screen Filler

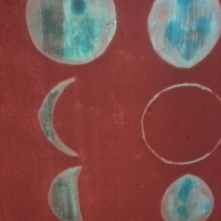
Influenced by the autumnal weather of the weekend, I set out to create a print of moon phases. For this second print, I wanted to try using drawing fluid. Drawing fluid works to make a design directly on the screen – what the ink is to come through. Screen filler is then applied directly on top of the drawing fluid (once dry) to block any areas of the screen ink is not desired to come through.  Once the screen filler is dry, the drawing fluid is washed out of the screen with cold water, the screen is dried, and ink is applied to make the print.

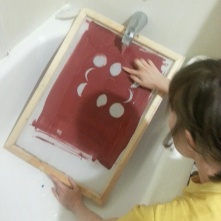
My work space is the same as with the first print; no additions to the setup. I first sketched my moon phases on the screen with a pencil; I had to think through, in using one ink color, how to differentiate the new moon from the full moon. I decided to fill the new moon circles with drawing fluid, which would allow ink to come through filling the circle, while the full moon would only have a perimeter of ink. After painting my design with the drawing fluid, I turned the fan on to dry the screen more quickly. After sitting around ten minutes, I used my hair blow dryer to expedite the drying process. Once the drawing fluid appeared (and was) dry to the touch, I poured a strip of screen filler across the top of the screen. When working with ink and screen filler in my first print, I poured them directly from the jar onto the screen; this time, I used a spoon from my old silverware set I replaced. This was interesting to me in considering the use of a tool – one not designed for the craft process at hand, but fits a use need. After the screen filler was distributed over the screen with the squeegee, it had to dry. Given the time of night at this stage of the process, I let it dry overnight. When I returned to the dry screen, I rinsed out the drawing fluid with cold water, which came off the screen easily. The screen prepared, I then applied ink (with the aid of a spoon) in a strip across the top, mindful of how much my first print seemed to bleed from using too much ink. I pulled the ink through the screen with the squeegee onto a small piece of poster board. While I think the lines were cleaner (more defined) in this print as to my first, I was not happy with how the design looked once printed as a single layer print. It remains in an unfinished state until my next printing; perhaps to be layered with another design, or to add a second color to this print to give the moon phases more depth and definition.

In cleaning my screen after this print, given my experience with using a full bottle of Speedball cleaner (at a price of $8) that was rather harsh on my eyes, nose, and skin, I wanted to try using detergent – something I read as an alternative cleaner. I began with hot water and dish detergent – no effect. I then tried laundry detergent – no effect. I then tried stain remover for laundry and carpet, and Lysol liquid concentrated cleaner. I scrubbed around fifteen minutes, with no result.

I turned to discussions on the web and read that some people use a power washer, like an outdoor house or the house at a self service car was to clean their screens. We don’t have a hose, so I decided to take my screen to the car wash because it wasn’t coming clean. While the hose seemed to remove some of the screen filler, the screen wasn’t coming clean. After spending ten dollars and seeing only limited results, I decided to turn again to the web. I read that others use Mr. Clean or a product called Greased Lightning. Before heading home I stopped by the grocery store to purchases the cleaners. Once home I tried both independently, but without much effect. At this point, I questioned whether soaking might help the cleaning process. I don’t have a tub stopper, so I blocked the drain and filled the tub with hot water, and a combination of Mr. Clean and Greased Lightning. I weighed down the screen so that it was submerged and let it sit. Returning to it, the screen filler remained.

The next day, I stopped at the Art Store to purchase more Speedball cleaner and to talk to employees there to inquire about any techniques that they might know of. While helpful, they recommended the same series of cleaning products I already purchased, and vouched for the Speedball cleaner. No one had any suggestions as to why the screen filler was more difficult to clean with this print, aside from the cleaners I was using not possessing the same chemicals as the Speedball cleaner. For future prints, I would like to understand what chemical is necessary for cleaning and if there are any other conditions that might influence the cleanup process. The screen is currently sitting in the Speedball cleaner soaking.