The Workshop

In Richard Sennett’s The Craftsman, he says of the workshop that the “workshop is the craftsman’s home. Traditionally and literally so” (53). In previous posts, I have mentioned the not so desirable workspace I have for printing – my (low) kitchen table in my kitchen.

"workshop"

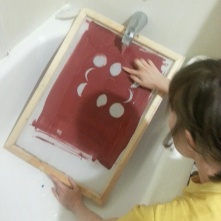
My last round of prints, which were of two small designs, took a total of seven hours from start to finish: sketching, painting drawing fluid, drying, painting screen filler, drying, making the prints, washing the screen (this doesn’t include the amount of time it takes for me to convert my “workshop” back into my kitchen, or my “washing station” into my shower. Both spaces need to be cleaned and reassembled after this process.) During this time I am on my feet. I’m not sure of the physical/body reasons for this, but sitting to print seems improbable to me. Here is where a technical account should occur, but I haven’t the language for it, so put crudely: I don’t have the same control and dexterity of my hands (and what they’re doing is remarkable in range) and arms sitting, especially at my low table. And given that this workshop is actually my kitchen and is small (and occupied by two curious cats that watch on), I am back and forth washing my limited amount of tools, my hands so as to not sully the process or product, and the screen as it advances in the process.

When I print, I am enjoying myself. I am listening to Radiolab or music and I get absorbed into the process, that is until physically I am pulled out of my head and made aware of my body: back ache. Printing in my workshop space is grueling on my back, but for the most part I do not focus on this, I instead focus on the progress of the print. I typically take a break about halfway through the move to the living room to stretch and lie on the floor a minute to give my back a break. This last time though, despite feeling just about everything that is able to crack in my neck, shoulders, back and wrists pop, one side of my back and neck went into a state of cold numbness and I was forced in that moment to think about my workspace. Printing requires much from my body for the process, not just my hands, but movements that involve my arms, wrists, shoulders, and back. Craft does require the body as an integral part of the making, and I had never been made so aware of my own body then I was in this moment. I thought, this is why space matters, this is why workshops aren’t often transferable to any space – there are conditions that must be attended to. Craftspersons have established workplaces because the process is involves and requires certain material conditions. While I have been able to make without some of these elements, if I am to continue doing this (and I would like to) I have to envision the space and conditions of doing it as I view the process of making – with care. While I don’t think this quite gets to the naturalism of John Ruskin, I do find myself uninspired by my transitory kitchen workshop, which I feel in my craft. Each part of the process becomes felt, no longer embodied, I am aware of timeĀ  passing and time left to take, and begin thinking about the transformation back into cooking and eating space and the scrubbing of paint and Speedball Cleaner from my bathtub before it can be used again. This is hardly the imagination necessary for designing and making.

A parting word on ventilation: it’s critical. I think about my dad’s workshop in the garage – “industrial” surfaces that are easy to clean, high ceilings, many windows and or/door to open, waist high and lower chest high work surfaces. It’s part in the garage because we don’t have room in our tiny house for a workshop, partly because of the nature of much of my dad’s work – wood work, welding, working on cars and the like, and part because of the materials and solvents he’s working with. Printing itself, although using chemical materials, isn’t as noticeable, but the cleaner is. In my tiny bathroom with a functionless (it lets some light in) window, the steam created from cleaning the screen fills the room. I have yet to clean a screen without getting a headache, and I think it’s attributed to the cleaning agent. While this isn’t a universal requirement of printing, I think there is a reason many print workshops are in more open industrial settings aside from space to set up the many materials – air circulation and ventilation. This, like my workshop space, has been something I’m dealing with because I don’t have other resources available, but it is not sustainable space.

Next apartment criteria: a workshop space (and a taller table) so I can live in my living space and in my working space and not an uncomfortable transitory space in between that seems to be at odds with both.

hand(s) tool

In making this last print, I became aware at how much I used my hands to print:

  • to draw the design with pencil
  • to stir and apply the drawing fluid with paintbrushes of different sizes
  • to touch the fluid to ensure it dried
  • to stir and apply screen filler with a paintbrush
  • to ensure the screen filler is dry to the touch
  • to gauge the temperature of water, cool, to rinse out drawing fluidĀ and to use the fingers as a brush to help remove the drawing fluid
  • to dry the screen while making sure the screen filler is still set
  • to measure and cut papers to print on
  • to mix and apply ink
  • to draw ink over the screen with the squeegee, ensuring thickness is even
  • to hold the paper under the screen in place during the printing
  • to lift the screen steadily while holding the paper in place to prevent smudging
  • to open seals
  • to wipe drips
  • to clean – to apply screen cleaner with a wide paintbrush on both the front and back of the screen; to run hot water while scrubbing to remove screen filler (hot enough to break down the filler, without burning my skin)

Taking inventory allows me to gain perspective on what the process requires of me. Within each of those steps of the printing process is a calculation angle, pressure, a range of motion. And beyond my hands, how I position my arms, how I hold my elbows, how I bend over my kitchen table to print and over my bathtub to clean the screen. Pulling, pushing, scrubbing, sketching – each a small process unto itself. The movement, the actions of the process are wonder(ful) to me as someone who is learning to screen print through the process of screen printing – the cultivation of technique through embodied learning. I still make mistakes, I still lack precision, but I am printing in so far as I am making products.

Technique has a bad name; it can seem soulless. That’s not how people whose hands become highly trained view technique” (Sennett 149). Technique is intimately linked to expression. Richard Sennett’s chapter on “The Hand” is something I returned to as I felt a stasis in my printing – no visible development from the second to the third print. I questioned what, in the drawing fluid technique, didn’t produce a more skilled print. And while it is difficult to isolate a singular aspect of the process (too much ink, paper that isn’t porous enough to hold the print well), I can think about what I did or did not do. This is learning from the technique of printing – the looking at process and product as isolated and in unison to determine what seems to be “off”. A techniquing of technique.

Transitional objects”, material things that themselves change, what can engage curiosity: an uncertain or unstable experience…In developing technique, we resolve transitional objects into definitions, and we make decisions based on such definitions” (158-59). The materials, despite being the “same” as far as the state that they are in, still have great variance. Thickness, how long something dries, proportion of mixing materials – these keep the process of printing from being “same”. They are always unstable, and have potential for variance, which keeps technique in making in developing – in the process of.

Technique develops, then, by a dialectic between the correct way to do something and the willingness to experiment through error” (160). Despite variance, experience and growing knowledge of properties and actions permit technique. Though I have watched videos and read text directions on the web, I have not learned the “correct” way of printing from a printer in terms of apprenticeship. It is the combination of these web instructions with the material conditions and my (in)capability that foster technique.

We have become the thing on which we are working” (174). This seems odd to me that I don’t think of myself in terms of being a screenprinter, an identity as a craftswoman, but in terms of my screenprints – what I am making as process and product. My movements, my work, are situated in my body by what I am doing. I think about what is possible and limitations in my prints in the making of them; what results, what yields is because of a physical working.

Screen Printing: Drawing Fluid + Screen Filler

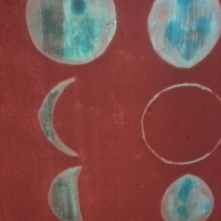
Influenced by the autumnal weather of the weekend, I set out to create a print of moon phases. For this second print, I wanted to try using drawing fluid. Drawing fluid works to make a design directly on the screen – what the ink is to come through. Screen filler is then applied directly on top of the drawing fluid (once dry) to block any areas of the screen ink is not desired to come through.Ā  Once the screen filler is dry, the drawing fluid is washed out of the screen with cold water, the screen is dried, and ink is applied to make the print.

My work space is the same as with the first print; no additions to the setup. I first sketched my moon phases on the screen with a pencil; I had to think through, in using one ink color, how to differentiate the new moon from the full moon. I decided to fill the new moon circles with drawing fluid, which would allow ink to come through filling the circle, while the full moon would only have a perimeter of ink. After painting my design with the drawing fluid, I turned the fan on to dry the screen more quickly. After sitting around ten minutes, I used my hair blow dryer to expedite the drying process. Once the drawing fluid appeared (and was) dry to the touch, I poured a strip of screen filler across the top of the screen. When working with ink and screen filler in my first print, I poured them directly from the jar onto the screen; this time, I used a spoon from my old silverware set I replaced. This was interesting to me in considering the use of a tool – one not designed for the craft process at hand, but fits a use need. After the screen filler was distributed over the screen with the squeegee, it had to dry. Given the time of night at this stage of the process, I let it dry overnight. When I returned to the dry screen, I rinsed out the drawing fluid with cold water, which came off the screen easily. The screen prepared, I then applied ink (with the aid of a spoon) in a strip across the top, mindful of how much my first print seemed to bleed from using too much ink. I pulled the ink through the screen with the squeegee onto a small piece of poster board. While I think the lines were cleaner (more defined) in this print as to my first, I was not happy with how the design looked once printed as a single layer print. It remains in an unfinished state until my next printing; perhaps to be layered with another design, or to add a second color to this print to give the moon phases more depth and definition.

In cleaning my screen after this print, given my experience with using a full bottle of Speedball cleaner (at a price of $8) that was rather harsh on my eyes, nose, and skin, I wanted to try using detergent – something I read as an alternative cleaner. I began with hot water and dish detergent – no effect. I then tried laundry detergent – no effect. I then tried stain remover for laundry and carpet, and Lysol liquid concentrated cleaner. I scrubbed around fifteen minutes, with no result.

I turned to discussions on the web and read that some people use a power washer, like an outdoor house or the house at a self service car was to clean their screens. We don’t have a hose, so I decided to take my screen to the car wash because it wasn’t coming clean. While the hose seemed to remove some of the screen filler, the screen wasn’t coming clean. After spending ten dollars and seeing only limited results, I decided to turn again to the web. I read that others use Mr. Clean or a product called Greased Lightning. Before heading home I stopped by the grocery store to purchases the cleaners. Once home I tried both independently, but without much effect. At this point, I questioned whether soaking might help the cleaning process. I don’t have a tub stopper, so I blocked the drain and filled the tub with hot water, and a combination of Mr. Clean and Greased Lightning. I weighed down the screen so that it was submerged and let it sit. Returning to it, the screen filler remained.

The next day, I stopped at the Art Store to purchase more Speedball cleaner and to talk to employees there to inquire about any techniques that they might know of. While helpful, they recommended the same series of cleaning products I already purchased, and vouched for the Speedball cleaner. No one had any suggestions as to why the screen filler was more difficult to clean with this print, aside from the cleaners I was using not possessing the same chemicals as the Speedball cleaner. For future prints, I would like to understand what chemical is necessary for cleaning and if there are any other conditions that might influence the cleanup process. The screen is currently sitting in the Speedball cleaner soaking.

Screen Printing: Screen Filler I

While it was difficult to make the decision on what to print, looking around my kitsch inspired kitchen (a fusion of cat, calico prints, vintage food ads, and punk touches) I recalled the “Cat Flag” poster print I have been wanting for some time. To create my first print, I decided to try the screen filler method. I browsed YouTube for tutorials on how the screen filler should be applied – what the consistency should look like, to what thickness it should be spread, and how long it took to dry/what it looked like dry. To begin, the graphic is drawn directly onto the screen with a pencil. I wanted the cats and the text to take the ink in the print, with the field around them remaining open. To achieve this with screen filler, the liquid must be applied everywhere on the screen that you do not want to allow ink to go through. Opening the jar of screen filler, it appeared separated – a clear liquid at the top with thick rust colored particulates (of gelatinous consistency) toward the bottom. I stirred the liquid with the stick of a paintbrush and began to paint it on. On the screen, the screen filler didn’t appear to have uniform consistency, so I continued to stir the jar and re-painted the area I had started. Controlling the substance was akin to painting with oils – around areas of small detail, it was difficult to keep the clean lines of the graphic I drew. With only two paintbrushes, I didn’t have a size large enough the cover open areas of the screen easily, nor did I have a brush small enough to attend to small elements – like around the letters’ edges or the cats’ eyes. Once the screen was coated with the filler, it had to dry.

I wasn’t sure how long the drying process would take, so I turned to searching for answers in online tutorials. The few I consulted stated that the screen could be left to dry overnight, or could be helped along with a hairdryer. I applied the dryer’s medium setting over the screen for close to ten minutes. The wet look of the filler turned dull, like a dark terracotta clay. When it was dry to the touch, I decided to try printing with the screen.

This first print was done with black ink on pieces of white and red matte poster board. I placed pieces of trimmed poster board under the screen, trying to mind where the print would fall. One set, I poured ink in a strip across the top of the screen. I didn’t measure, nor did I use a tool; it looked close to two tablespoons of ink. With the squeegee, I pulled the ink down across the print area on the screen, making close to eight passes back and forth. Lifting the screen, the paper stuck to it. Pulling the paper off, it seemed that there might have been an excess of ink due to its sticking, and that the design of the graphic didn’t appear to have clean edges – instead, the ink seemed to extend outside of the print area. I made two more prints without adding an additional ink. Both seemed to look similar in that they didn’t have clean edges. I set the prints aside to dry overnight somewhere out of the reach of the cats.

I immediately began to clean up my work space. Cleaning the brushes and squeegee was easily done in the kitchen sink with warm, soapy water. To clean the screen, I had a bottle of Speedball brand cleaner. I placed the screen in my bathtub and poured about a third of a cup of cleaner all across the screen’s surface and left it for five minutes (according to the directions). I began to scrub the screen with a nylon dish sponge, but realized only the ink was coming off while the screen filler remained. I turned hot water on the screen while I scrubbed, and while some of the filler began to lift in areas it was thickest, it remained. I poured another third cup cleaner on the screen and left it to sit. The directions called for very hot water, so when I returned to scrub the screen, I turned the shower on hot, focusing the stream of water on the screen as I scrubbed. The sponge didn’t appear to be abrasive enough, and I remembered a potato scrub brush I had in the kitchen. With the brush, filler began to come off, but it took focused scrubbing. Over phases of letting the screen sit and running hot water over it while scrubbing it, and becoming soaked from the waist up, I used up the bottle of cleaner (16 oz) in its entirety. After twenty five minutes of scrubbing, the screen had come mostly clean. The pencil drawing was still visible and a light tint of rust could be seen (like a negative of the design). I leaned the screen against the wall in the hallway of my apartment to dry overnight. After cleaning the screen in my bathtub, it was necessary to clean my bathtub.

This first print, with clean up, took close to four hours. While I was content with my first prints, my hands ached from scrubbing and my skin felt raw from the screen cleaner (I did not wear gloves). Between the drawing, painting, and printing which I did all standing up at my kitchen table (which stands at less than 2”5, while I stand at 5”7) and kneeling into my bathtub to clean the screen, my back ached. For future prints, while limited to this space, I will have to make adjustments to this process. Another matter that arose was the smell; the ink, screen filler, and cleaner all had strong odors. I had the window open in my kitchen while I worked, but do not have a functional window in my bathroom. After I was finished working, I positioned fans to try to ventilate the space. It only occurred to me then to read the label on the cleaner, which carries a Caution Label for hazardous materials. Although it is deemed safe to use with appropriate caution. I looked up the label on the web to learn that it was a skin and eye irritant, not unexpected, but that it also shouldn’t be inhaled, particularly as a mist. In my unventilated bathroom with the shower on hot, I assume this could become potentially hazardous. I searched on the web for alternative screen cleaners and read that detergent could be used.

For my next print, I need to take steps to alleviate back strain during the process. I would also like to try cleaning my screen without using the Speedball cleaner. After this first print, I find myself really thinking about the idea of a workshopĀ  – a designated place to work in. Some place that equipment and tools can remain up/out, and that has furniture or equipment conducive to what needs to be done in order to make. How essential is this space?

Gathering Materials

Last week I purchased my materials to begin screen printing, $100 easily (but excitedly) spent. At The Art Store I purchased:

  • a squeegee
  • 4 jars acrylic ink (not for cloth) in green, black, red, and turquoise
  • a screen with base (need to measure its dimensions | 124 mesh)
  • a combination back of screen filler and drawing liquid
  • 3 pieces of poster board (red, black, white)
  • a bottle of screen cleaner

I brought the materials home to set up my (temporary: something to return to – the concept of a stationary workshop) workspace on the kitchen table. I had the idea to buy a really thick, lined plastic tablecloth to cover the table, but happened upon a spare shower curtain liner to use instead. Other materials I am considering acquiring: through by dad (an all around handyman) an incandescent worklight (or two), a collection of variously sized paintbrushes (I only have two), different types/sizes/colors of paper, fabric ink, found fabrics (on the cheap), something (unsure as to what yet) to dry prints on horizontally that doesn’t appear to be a place for two cats to nap, and some kind of lift to elevate the screen when working on the kitchen table surface (while standing), which stands at under 2.5 feet.

To write about my making process, I would like to make use of the fieldnote method of James Spradley (utilized in participant observation) described in Nicholas H. Wolfinger’s “On Writing Fieldnotes: Collection Strategies and Background Expectancies” which takes note of:

Space: the physical place or places

Actor: the people involved

Activity: a set of related acts people do

Object: the physical things that are present

Act: single actions that people do

Event: a set of related activities that people carry out

Time: the sequencing that takes place over time

Goal: the things people are trying to accomplish

Feeling: the emotions felt and expressed

Along with taking photographs and short video samples to make visible the process of production, products, problems, and byproducts.